Search This Blog

Showing posts with label CTMH Art Philosophy. Show all posts

Tuesday, October 2, 2012

Thinking of you


Hi there!  Hope you all are having a great day.  It's another hot one where I live and it's becoming very unbearable late in the year :(.  I did something I haven't done in MONTHS - I played with my Gypsy!  I must admit I had to fumble a lot to get the hang of it again.  Today's card is going to be linked to the following challenges and all cuts were made using my Cricut:

**Fantabulous Cricut Challenge Blog - Challenge Me Monday #131 pink
**Bitten By The Bug 2 - tree
**Love to Create - Challenge #35 thinking of you
**The Old Back Porch - 52 Card Pickup week 39

The card is sized to fit an A2 envelope (seen above where the card is standing on).  The base of the card is actually a frame from the Cindy Loo cart with the tree.  I just welded two of the frames to make the base and used hide contour for the pieces I didn't want cut.  The hearts are from Baby Steps and the butterflies are from the CTMH Art Philosophy cart.  The phrase thinking of you is from Gypsy Wanderings.  I used the CB folder Branches and D'vine Swirls.

Some close ups:


I am hoping to get another card posted with the same theme - what can I say it was a loooong wait during my kids' after school activity yesterday so I got reacquainted with my Gypsy ;).  Once again, I do appreciate you stopping by!

Tuesday, April 17, 2012

Turn your umbrella upside down


My SIL's birthday is this Friday so I thought I'd get started on her card early.  I am also entering this card in a couple of challenges this week, (1) Polka Doodles [Pretty in Pink Challenge] and (2) Fantabulous Cricut [April Shower - umbrella, clouds, or rain challenge].  This card is an A2 sized card. 

Here's a side view of the card:


For the front of the card, I cut the umbrella from the American Alphabet cart that came in pre-loaded on my AE2.  I cut the blackout and the top layers two times and put them together using foam mounts for depth.  I attached a strip of ribbon in the middle of the top layers.


The three rolled flowers were from the Art Philosophy cart.  The presents were cut free-hand from my stash of scraps.  I used one of the border folders from the  With Love CB border folders for the flowers on the side of the front and Swiss Dots CB folder for one of the presents.  I used twine for the presents.  I also used a doily MS puncher and Recollections rhinestones. 


Here is a look at the finished inside of the card - I used the same MS doily puncher for the matching cardstock. 


The sentiment on the outside and the inside of the card were printed and cut using the print and cut feature of the Silhouette Cameo.


I sized a box cut line for the inside sentiment by 4.125 x 5.375 inches, then wrote my sentiment inside this box cut line.  The sentiment in the front of the card is seen on the bottom of the screen and it says "Yep, better keep that umbrella turned upside down..." using the Abbeyline font.  The sentiment in the box that will go inside the card reads "...'cause you're bound to be showered with gifts today" , and "Have a wonderful Birthday" using the Harrington and Before the Rain fonts, respectively.   I did not put a box cut line around the sentiment for the front of the card because I thought I had a die to cut it with but ended up cutting it with a pair of scissors. 

Thanks for looking! 


Wednesday, February 1, 2012

Valentine's Card For My Hubby


I'm so ashamed to admit that I have always bought my husband Raj a Valentine's card instead of making one. But not this year, and hopefully not anymore.  I oftentimes get in a slump when it comes to making cards for my hubby and my children cause I'm so picky.  But I apparently I don't have any problems making one for anyone else LOL!  I'm really going to try to change my ways. 

This card is 5.5 x 5.5.  All supplies used were from my stash.  The bench image was cut with the Cameo.  When I first saw this bench with the heart cutout from the Silhouette Studio store, I knew I had to have it for Raj's card. It reminds me of the days when we were dating and we would always frequent a park and have lunch on a bench watching and feeding ducks.  I knew then I wanted to marry him and spend the rest of our days holding hands.  Ok, enough sappiness from me!  The flowers were from the Cricut Art Philosophy cart.  The sentiment is a stamp from Recollections.  I did some stitching on the mat for texture.  The little red hearts with our initials on them were leftover cuts from my DD's Vday treat bags I posted below this one. 

BTW I spent a good amount of my day yesterday learning to watermark my photos.  Yes, it took me several hours of watching different YouTube videos cause each one I watched is just a tad different from another, and this poor old brain of mine was having a hard time processing everything in one sitting.  The software I'm using is a free one from Gimp, as recommended by someone (sorry forgot who it was) from the Cricut Circle MB.   Anyways, I'm still learning. 

I am also linking this project to She's a Sassy Lady blog.

Thank you so much for stopping by!

Tuesday, January 24, 2012

Just a Note


Hi again!  I really liked the card sketch from the Card Patterns blog this week, and since I have left-over cuts from my previous card (see post below this one), I decided to make a card for one of my sisters following the sketch below (she just got a new job so I wanted to make her a congratulatory card).   I will not be linking this project to Card Patterns blog since I have already linked the other card.  


The base of the card is again from the Cricut CTMH Art Philosophy cart, as well as the coordinating scalloped image and the circle, which I also sewed onto the scalloped image.  The 3D flowers were also from the same Cricut cart.  The lace ribbon is from my stash.  I added white pearls to bling it up a bit.  I also added a homemade stick pin I've been dying to use.  The sentiment is computer printed using the Curlz MT font and then cut with the Cameo.  The scalloped frame that the sentiment is sitting on is from the Silhouette Studio store.  

Here are some closeups:


Thanks for stopping by!  

Sunday, January 22, 2012

U R 2 sweet! - Card Patterns #149


Happy Monday!  Today's card is a shaped card, following a sketch  by Tracy Schultz of Card Patterns Blog (sketch #149), as pictured below:

The card is roughly 5 x 5.  The base of the card is a card feature cut with the Cricut using CTMH Art Philosophy cart.  The doily and the circle were also the coordinating layers of this card feature.  Another Art Philosophy cart cut were the 3D flowers.  I sewed the circular layer onto the doily using my Janome sewing machine for some texture.  The ribbon is by American Arts.  The sentiment "U R 2 sweet!" was cut using the print and cut feauture on the Cameo, using the creampuff font.  The cupcake was also cut using the print and cut feature on the Cameo from the Silhouette store. I added some light pink half pearls to embellish. 

Below are some close ups.


Thanks for looking and I hope you all have a wonderful week!

Tuesday, January 3, 2012

Dadaji's Birthday Lunch - Use Your Stash Challenge 2012


Happy Tuesday!  I trust everyone had a wonderful New Year's Celebration.  Ours was quiet, just stayed home.  My kids went back to school today after their 2 weeks winter break so I hope to get back to my crafting more often now.  If you have been following me along, you already know that I have recently bought a Silhouette Cameo to supplement my Cricuts.  Since this is such a major purchase, I needed to curb down the craft spending for a while.  I am participating again in the Cricut Circle MB challenge Use Your Stash.  Last time I did alright, even saved up to buy a mini sewing machine.  This time MamaC, aka Carolyn, has passed on the torch to Gonescrappin aka Colleen.  The first round of this challenge will run from January 2nd to March 31st.

For my first project of the year I thought I'd make an early dent on our 2008 (yes, that's NOT a typo LOL!) album that I have been working on and off.  This one is a 12x12 LO, celebrating my FIL's 78th birthday.  In case you're wondering, "Dadaji" (what my kids call him) means grandfather from your dad's side, in Hindi. 

Some closeups and details:


The title, "Dadaji's birthday lunch" was cut using the Cameo, using a Word font called "Quiggley Wiggly" which I sized and welded to my liking and then used the offset feature to make the shadow.  Other Cameo cuts were the "78th" in the same font, and the notebook which I used for journaling.

I used my Cricut to cut the frames for the photos from the Elegant Edges cart.  The pennant was from CTMH Art Philosophy cart and is embossed with the Argyle CB folder and embellished with twine.  Another Cricut cut was the present, also from the CTMH Art Philosophy cart and is embossed with D'vine Swirls CB folder and also embellished with twine. 

I was just cleaning up my craft space and couldn't believe the scraps of papers I have accumulated in God knows how long!  So one of my goals for this challenge will be to use them up!  I should really organize them too. 


Well thanks for stopping by and until next time, have a wonderful week! 

Saturday, December 31, 2011

Mya's door banner


My last project of the year!  My 6 year old DD wanted a banner for her room so with her help, we went to work ;) !  This project is actually a mixture of Cricut and Cameo cuts.  As I promised in my last post, I am really going to try to use both machines in all my projects from now on.  I am also linking this project as my first entry for the Silhouette Plus forum challenge to use something incorporating any image that we have gotten for free from Silhouette Studio. 

For this challenge, the base of the 3 pennants was one of the 51 free images I got for signing up to try Silhouette Studio before I decided to buy the Cameo.  The pennants  were cut at 11.525 inches and I was able to cut 2 from a 12 x 12 cardstock.  Another Cameo cut were the letters to my DD's name, Mya; I used a Word font called "creampuff" and used the offset feature  to create the shadow for each letter (so cool and easy to use feature!).  I embossed the letters with the Plum Blossoms CB folder and did faux stitching on the shadow with a white Sakura gel pen.  Then I put 3 flower buttons on each letter to embellish them.  I also added a homemade maroon crinkled ribbon to each pennant.  I did some real stitching on each pennant too using my sewing machine. 

The Cricut cuts I used for this project were (1) the flowers [CMTH Art Philosophy cart and Flower Shoppe cart], (2) vines [Wall Decor and More cart], (3) crown [Once Upon A Princess cart], and (4) roller blades [Groovy Times cart].  I used some irock gems on the crown and stuck a craft pearl on one of the flowers. 

Below are more closeups of each pennant.  My DD and I had so much fun using both machines! 

Thanks for looking and I wish you all a wonderful New Year!  See you next year ;)

Thursday, October 13, 2011

CC Blogiversary Challenge #6 - "U R how old?" GC tag


Hope everyone is having wonderful Thursday so far.  Almost Friday.....hang in there! 

Well stick a fork in me I'm done!  This is my entry to the last CC Blogiversay challenges.  For this challenge we were instructed to follow a sketch outline created by the awesome CC DT Cindy Royal.  Below is the sketch we were to use for inspiration:

     Image copied from CC Blog, created by Cindy Royal

I opted to make yet another giftcard tag, this time for my eldest brother who is celebrating his birthday this Saturday.  The base of the tag is a stamp tag image from Base Camp.  I also cut the coordinating stamp image from the same cartridge for layering.  The banner is from the CTMH Art Philosophy cart.  The balloon image and its layer are from the Smiley Cards cart.  I decided to use a Peachy Keen stamp for the face as the facial feature did not look good to my liking cut at 1.50 inches.  The cake image is also from the Smiley Cards cart. The sentiment "U R how old?" was cut from Base Camp cart.  I have used this sentiment in another card before and I really like pairing the sentiment with the surprised and the laughing emoticons ;). 

Here is a shot of the back of the giftcard tag.  I cut another layer in the blue printed cardstock but cut part of the image on the top so that the giftcard can easily stick out and be noticed (haven't bought the giftcard yet).  I finished off the giftcard tag with a ribbon, some buttons in the front and the back and some doodling. 


I am happy to mention that all of the supplies used were from my stash.  Project #10 for Using My Stash pledge at the CC MB!

Thanks for stopping by.  I had fun entering all the challenges and have enjoyed looking at others' creations throughout the week at the CC MBs and the CC Blog.  Good luck everyone!  

Monday, October 10, 2011

CC Blogiversary Challenge #5 - Cutie Frame


Today's project is my entry for the CC Blogiversary Challenge #5 - "Recipe" Challenge.  Our mission for this challenge was to follow a "recipe" as stated below:

Use your Cricut machines to create a project using the following “recipe.” It must contain 1) A Title; 2) Atleast 2 Cricut Cuts, and 3) At least 3 buttons.

Here is a side view of the frame:


For this challenge I've created a frame for my 6 year old DD's fall class picture.  The frame and its layers came from the Fancy Frames cart.  (I had to cut the bottom layer in purple cardstock  2x and the "stand" 2x to make a sturdy frame.  I tried cutting chipboard with my E and my E2 but they were both screaming bloody murder even with the deep blade, the highest blade setting and several multicuts - someday I will be successful at cutting chipboard but for now cutting multiple layers of the same cut to make them sturdy works for me.)   The butterfly and its layer was cut using the Cake Basics cart.  I embossed the top layer with the D'vine Swirls CB folder and attached the two layers to each other only in the middle with foam mounts.  Then I glued 3 small pink buttons.


The green banner was cut using the CMTH Art Philosophy cart.  The title "Cutie" and its shadow layer was cut using the Hello Kitty Font - the layers were attached together using foam mounts and the the top layer was embossed with the Plum Blossoms CB folder.  I also added  3 green irock gems in each letter.  The flowers were from the Flower Shoppe cart, 2 different flower images cut in varying sizes, then embellished with 2 buttons with jute twine.  The leaves were from the Heritage cart, the top layers embossed with the Script CB folder. 


I finished off the frame with 3 pink half pearls in the top right side of the frame to somehow balance the look. 

I used only what is in my stash for this project, so this makes project #9 for my Using my Stash pledge at the CC MB. 

Thanks for looking - have a pleasant Monday! 

Friday, September 23, 2011

Gift tag card


Happy Friday!  Today's project is a card I made for one of my nieces who turns 6 this weekend.  Actually it has become a card-turned-into-a-gifttag.   Well I didn't mean for it to be a gift tag but with the 3D flower added to it, it would have been tough to fit it in ANY envelope, even if I had to make one.  Either way I'm happy at how it turned out.  And best of all, I was again able to use supplies from my stash so this is project #3 for me for the Using My Stash pledge over at the CC MB!  I've been really proud of myself - went grocery shopping at a Smart and Final yesterday next to a Michaels and I didn't even go in!  I heard (LOL) the clearance bins outside Michaels calling for me and I held my own! 

Another look at the gift tag card.

Details:
*base card is made out of 2 of the same present images from Create a Critter cart, welded together
*with the same image as the base, cut one in printed paper (from a very old K&C 6x6 stack), then the top layer embossed with Plum Blossoms CB folder
*"Happy Birthday" cut from MS Elegant Cake Art. top layer embossed with Swiss Dots CB folder
*3D flower from CTMH Art Philosophy cart with craft pearl
*irock gems

Thanks for looking and have a wonderful weekend ahead of you! 

Wednesday, September 21, 2011

E2 HSN Launch Banner Entry #2 - Ornament Banner


Hello there again!  Today I'm sharing my second banner for the E2 HSN Launch banner contest.  For the details of the contest, please see my post yesterday, below this one.  I call this banner my Ornament Banner but my 6 year old really wants to call it the Jingle Banner because, well....each piece actually jingles when you shake it LOL because of the little bells attached to it - but I will get to that later.

The base for each piece came from the ornament image from the exclusive CTMH Art Philosophy cart.  I used hide contour on my G to hide the cuts on the upper part of the top layer because I knew that part was going to be covered by the ribbon anyway.  The bottom layer was cut once in printed cardstock and the other cut in plain light blue cardstock, just so I can have  thicker pennat pieces to work with. 


I also attached a small piece of craft plastic in between the two bottom layers to make them stronger and not tear when I finally hang them.  For this plastic piece I offset the image in my G so that only the top parts of the ornaments get cut.


After attaching the piece of clear plastic to the light blue layer, I attached the printed layer over, again for added strenght so that the paper won't tear when attached to the banner. 

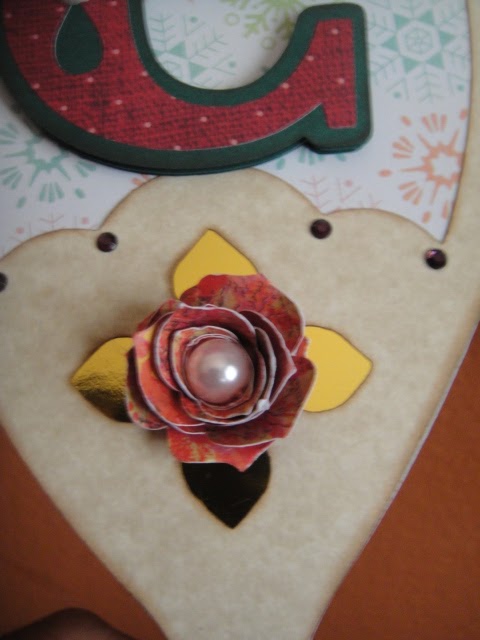
I used the the font from the MS All Occasions Cake Art cart to spell out "Cricut".  Each letter has 3 shadow layers under the top layer to give it more dimension.   I used foam mounts in between.   Then I attached half pearls to embellish the letters. 


The top ornament layer is embellished with some irock gems, different color for each pennant piece.  I inserted a piece of gold shimmery cardstock to show through the bottom part of the ornament top layer, then I attached a 3D flower from the CTMH Art Philosophy cart.  There's also a craft pearl in each 3D flower.

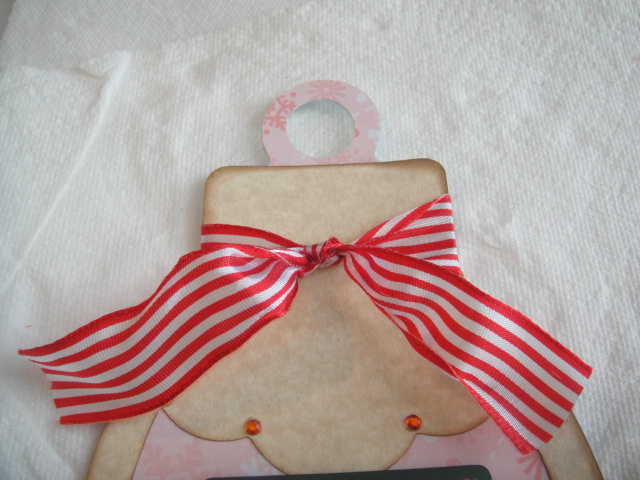
For the top of the ornament, I tied a wired ribbon.  And since I can't really make a decent bow half the time I knew I needed to cover up the middle part LOL! 

I just tied a knot instead of killing myself trying to make a pretty bow ;)

To cover up the ribbon knot, I used a snowflake image from the MS All Occasions Cake Art (used hide contour for the center of the image).  I used a white glittered paper for this cut.  I then poked a hole in the center using a Cricut tool (the one that looks like a dental scraper). 

Then I threaded 3 small bells using jute twine and threaded that through the hole in the snowflake image. I tied the back of the snowflake in the front of the ugly ribbon knot. 

There you go - it nicely covered up the ugly ribbon knot, don't you think?  Plus each pennant jingles when you shake it ;).   I finished off each pennant piece with a red tulle to hold it in place.  And I almost forgot to mention that I inked each top layer for added dimension. 

Here's another shout out of one of the pennants. 
Thanks for stopping by and again, good luck to all who have sent in their banners! 
 I actually had fun doing the banners, win or lose.  I've also seen some very wonderful banner creations from fellow bloggers and all over the Cricut MBs - sooooo excited! 
 I would hate to be the one judging each banner as they are all so stunning!

"See" you all next time - happy crafting!