Search This Blog

Showing posts with label Flower Shoppe. Show all posts

Saturday, December 31, 2011

Mya's door banner


My last project of the year!  My 6 year old DD wanted a banner for her room so with her help, we went to work ;) !  This project is actually a mixture of Cricut and Cameo cuts.  As I promised in my last post, I am really going to try to use both machines in all my projects from now on.  I am also linking this project as my first entry for the Silhouette Plus forum challenge to use something incorporating any image that we have gotten for free from Silhouette Studio. 

For this challenge, the base of the 3 pennants was one of the 51 free images I got for signing up to try Silhouette Studio before I decided to buy the Cameo.  The pennants  were cut at 11.525 inches and I was able to cut 2 from a 12 x 12 cardstock.  Another Cameo cut were the letters to my DD's name, Mya; I used a Word font called "creampuff" and used the offset feature  to create the shadow for each letter (so cool and easy to use feature!).  I embossed the letters with the Plum Blossoms CB folder and did faux stitching on the shadow with a white Sakura gel pen.  Then I put 3 flower buttons on each letter to embellish them.  I also added a homemade maroon crinkled ribbon to each pennant.  I did some real stitching on each pennant too using my sewing machine. 

The Cricut cuts I used for this project were (1) the flowers [CMTH Art Philosophy cart and Flower Shoppe cart], (2) vines [Wall Decor and More cart], (3) crown [Once Upon A Princess cart], and (4) roller blades [Groovy Times cart].  I used some irock gems on the crown and stuck a craft pearl on one of the flowers. 

Below are more closeups of each pennant.  My DD and I had so much fun using both machines! 

Thanks for looking and I wish you all a wonderful New Year!  See you next year ;)

Tuesday, September 27, 2011

Tea-rific!


Today's card is again from my stash and is my project #4 for the Using My Stash pledge over at the CC MB.  This is for nobody in particular, just replenishing my stash of cards. 

The base of the card is from Damask Decor.  Then I cut the teapot layer 2x and foam mounted them onto the base for added dimension.  I also inked and embossed the top layer with Plum Blossom CB folder.   The 3D flower is cut from the Flower Shoppe cart; I added the craft pearl in the middle.  The leaves were cut freestyle but I think it works ;).   I added some Ranger glossy accents for the faux dew drops effect.    The sentiment is computer generated then cut to size using an old Fiskars scissors.  The teabag image was cut freestyle as well (I'm sure there's probably a Cricut image for a teabag, I was just too lazy to look!).   Jute twine was used to attach the teabag image onto the teapot handle. 


I added a piece of moss green cardstock inside the card and a strip of the same printed cardstock as the base for the inside bottom.  The strip was punched with a lacy MS puncher.  To finish it off I added 3 pink half pearls. 


BTW that was some Cricut "party" yesterday, huh?  Neither one of my banners won for the HSN E2 launch, but that was ok because there were so much more deserving winning banners.   I am in awe of some very talented Cricut users - such inspiration!  My consolation was that at least one of my banners got TV "face time" on HSN (the ornament one) - my kids were so excited when we watched it on DVR.  Although I already have the E2 Anniversary Edition I think my husband would have bought me another E2 because of Jinger; it was the way he asked me "do you already have that one?" while Jinger was holding the cork board containing one of my banners......men!  That's ok though, I'll just tuck that little tidbit of information for use later - I'm sure I'd again want something PC-related on HSN that Jinger would most likely be showcasing LOL!     

That's it for me for today, hope everyone has an awesome day!  I thank you again for stopping by! 


Tuesday, September 20, 2011

E2 HSN Launch Banner Entry #1 - Gothic Cricut Banner


Well hello there!  By now, everyone in the Cricut world knows that Cricut is launching its E2 machine on HSN on September 26th.  If you haven't yet heard the news, here's  an excerpt from Cricut:

CRICUT EXPRESSION 2 DESIGN CHALLENGE
On September 26th at 12:01 AM EST Provo Craft will launch the Cricut Expression 2 on HSN. We want everyone to join in the fun by designing a pennant banner for a chance to be one of FIVE lucky people to win the new machine when it debuts on HSN. Here’s how. Send an original pennant banner to enter to win the brand new Cricut Expression 2. If you watch every airing on HSN you might also see your design on live TV with Jinger.
RULES:
  • The contest runs August 22 – September 21 and all submissions must be received at the Provo Craft office by 5pm September 21nd.
  • Anyone can participate ages 18 and older (U.S. and Canada only).
  • Submissions must be a pennant banner (see examples)
  • Pennant banner should spell out “Cricut.”
  • Submissions can use any Cartridge made by Provo Craft.
  • Submissions must not include photos.
  • Submissions will not be returned and will become the property of Provo Craft.
  • Submission may be shown on a National TV station.
  • Judging will be done at the sole discretion of Provo Craft.
  • You may enter up to 2 pennant banners.
Please send all submissions to:
Provo Craft
Attn: Jinger Adams
10876 S. Riverfront Parkway, Suite 600
South Jordan, Utah 84095


Winners will be announced after the first five HSN airings on September 26th. Look for the announcements on both facebook.com/officialcricut and facebook.com/Jingeradams.
Good Luck everyone!

Now I already have an E2 Anniversary Edition but I am playing along simply because it's FUN, and if I do win an E2 I plan on giving it to my sister.  Another incentive for me is that there will be a $150 credit given to Cricut Circle members whose banners get chosen.  Sweet!  This is the first banner that I'm calling "Gothic Cricut" and my inspiration of course is the upcoming Halloween!

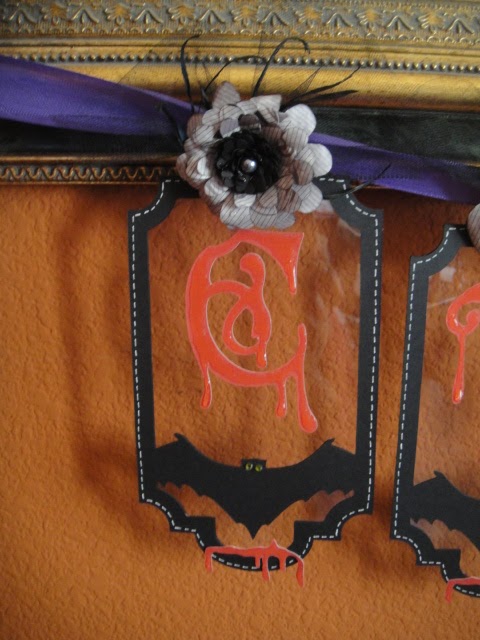
A few close ups of the banner:

For the banner base I chose the tag feature on the Wrap it Up cart.  The blackout feature image was cut using clear craft plastic by Recollections I bought from Michaels.  Then the tag front was cut using black cardstock.  I cut the top layer 2x so that I can attach one layer in the back behind the clear plastic - this also served as spot for me to put my name and cartridges used behind the pennants (I wrote really small because as you all can see, there's not much room!).  I did some faux stitching on the front and attached green irock gems for the eyes of the bats.  I then attached a droopy blood image from the Happy Hauntings cart just below the bat.  The font I used for the title was also from the Happy Hauntings cart.  For a little droopy blood effect, I used Ranger Glossy Accents on the "blood" and the title.  Hope the picture kinda gives you an idea (see above pic). 

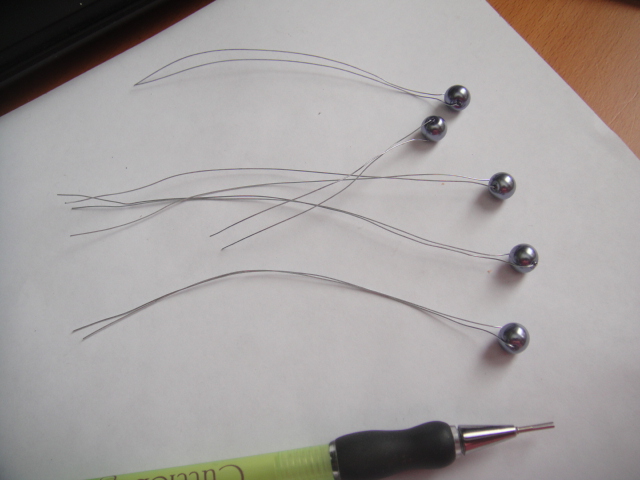
For the flowers attached to each banner pennant I used a total of 4 different cuts from the Flower Shoppe cart.  I used  a jewelry gauge wire to attach a gray craft pearl and inserted that in the middle of the flowers - the gauge wire served as anchor for each pennant - with the banner being shipped via USPS,  those babies aren't going anywhere LOL! 


I poked a hole on the bottom of the center piece of my flower before I hot-glued to finish it off.
Then I threaded the jewelry gauge wire through before I attached the center piece to the rest of the flowers. I added black raffia and black tulle to hold the flowers and the pennant pieces together.   And that's it!  Hope you like and good luck to all who are entering the banner contest!  I mailed both of my banners early last week. 

Tomorrow I will share the other banner I created.  Happy Tuesday!