Search This Blog

Tuesday, January 25, 2011

Cricut Circle Monthly Challenge


This is my entry for the Cricut Circle Challenge.  We were supposed to scraplift one of the projects that was done by one of the Circle Blog Designers and put our own twist to it.  There are so many awesome designers at the CC blog that it was hard to choose just one so my daughter sort of chose one for me to copy - she wanted a sign for her door to keep boys out of her room.  (Now my son wants one too to keep HER out of his room - but we'll get to his sign hopefully later next week)  In addition, we were to use products from at least 2 of the blog's sponsors. 

Below is the inspiration that I scraplifted.  It was a door sign created by Jana Eubank on December 15th, as posted in the blog.


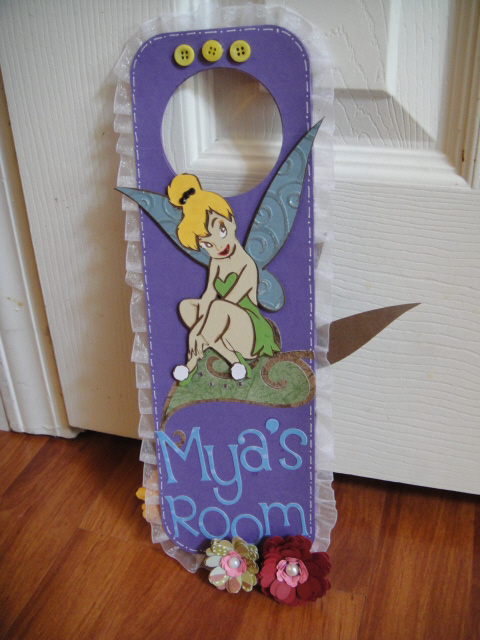
I wanted to make the door hang sturdy but I didn't have any chipboards, so I just went ahead and cut the door hang image using regular cardstock and layered them for thickness - so thrilled to be able to use my new Xyron 900 Creative Station for this job!


I cut a total of 6 door hang images, again for thickness.  After stacking the first three together, I proceeded to put the sheer ribbon around the edges before I stacked the other three layers.  


BTW if you've never cut Tinker Bell, do NOT cut her any smaller than 6 inches - darn Tinker Bell almost brought me to tears to assemble, I kid you not!  

Here's another look at the double sided door hang.


Here are the details of my project:
* Products from blog sponsors - Irock gems on Tinkerbell's hair and on the leaf cut, and Bazzil Basics Paper for the door hang image cuts
*Cricut cuts used - Tinker  Bell (front and back of door sign) and her layers, as well as the leaf and layer  from Disney - Tinker Bell & Friends cart, "Mya's Room" and "Go away!" letters cut from Alphalicious cart, door hang from Tags, Bags, Boxes & More cart
*buttons from my stash
*white sheer ribbon from the dollar store
*half pearls from Michaels
*flowers made using Cuttlebug Quilling kit
*white Sakura gel pen for the faux stitching and the whites on Tinker's eyes
*D'vine Swirls CB folder for texturizing Tinker's wings
*Star Dust Ranger Stickles to bling her wings
*butterfly is a 3-D sticker from K & C
Thanks again for stopping by and have a wonderful week!  

Tuesday, January 18, 2011

Oh, Baby!


Here is my entry for the Cricut Circle Challenge #16.  This week's theme is "Cute as a Button" and the rules are as follows:

Weekly Challenge #16: Cute As a Button Sketch Challenge!

Babies are definitely “cute as a button” with their sweet little faces and tiny features. In honor of our Baby Theme, this week we challenge you to create a SCRAPBOOK PAGE or CARD using the sketch below. Your project doesn’t need to follow the sketch exactly, but it should be apparent that you used it as inspiration. Feel free to turn it on it’s side or move elements to fit what you are doing. In addition to using the sketch, we also want you to incorporate STAMPING and BUTTONS (of course!).


I must admit I did go button and twine crazy with this challenge LOL!  I have a container-full of buttons I wanted to get rid of before I go buy more.  The card I created was 6x6.  Just realized that I used 6 different carts to make my card - wow that's so unlike me - but proud of myself for using more than 2 carts in a project!  It is so easy with the help of my Gypsy!

Here's the inside of the card - the coordinating paper on the bottom was punched with one of MS punchers. 


Card details:
- carts used:  MS Elegant Cake Art cart (scalloped strip); George and Basic Shapes cart (rectangle piece on top of scalloped cut); New Arrival cart (Baby); Stamping cart ("Oh Baby" sentiment); Mother's Day Bouquet (flowers and leaves); Simply Charmed (baby bottle)
- Stamps used:  Peachy Keen PK-493 Everyday Character Face Parts and More! for the baby's face(I haven't used my PK stamps in a while!); American Girl crafts stamp set for the 2 hearts; an old foam stamp for the inside of the card "Hip Hip Hooray". 
- Cuttlebug folders used:  D'vine Swirls (leaves), Swiss Dots (bottle), and Plum Blossoms (rectangle piece)
-and of course lots of buttons (10!) from my stash

Thanks for looking and have a wonderful week!

Tuesday, January 11, 2011

Giving Jinger My First.....


....tri-shutter card ever!  I have always wanted to make one but have always been very intimidated so I watched a bunch of videos of crafters sharing their tricks on how to make one on youtube.  I will share the videos I've watched below this post. 

So here is my card entry for the the Jinger Adams FB page contest.  Jinger, the spokesperson for Cricut is helping launch a new product on HSN on January 20th and is holding a contest for Cricuteers to send in a card with any or all of cuts from Don Juan, Winter Lace and Wall Decor and More carts.  Another criteria is to incorporate anything from Anna Griffin.  I must admit.....I didn't have any of Anna Griffin stuff so I headed over to my local M's yesterday.  All I could find was a stack of paper  from her "Isabelle Collection."  At first I wasn't feeling the vibes on this stack because all I could think about was "Diwali" (for those who don't know, it's the Indian New Year) colors LOL and I really wanted to make a card to dear Jinger for all her hard work.  In the end I was pretty pleased with the result - and I made my first ever tri-shutter card!  A little pain to make but I think with practice I could get the hang of making more in the near future.

Card details:
- base of card is from Recollections in moss green
- patterned paper from Anna Griffin "Isabelle Collection" pack
- brown cardstock to layer the patterned pieces
- sentiment is computer generated printed on white cardstock and cut out with circle Nesties and then chalked to match Anna's patterned paper
- scalloped circle cut from the same "Isabelle Collection" pack using scalloped Nesties
- flowers are Prima
- half pearl on flowers is from $1 section at M's
- blings are irock
- ribbon strands by American Crafts
- Cricut cuts from Wall Decor and More cart (coffee mug and layer, garland and mugs, and heart)
- faux stitching using white and granite Sakura gel pens
- envelope cut from Wild Card cart - not a requirement but I don't like to give a card without an envelope :)
- brads from my stash

Another look at the card from the inside - yes, I addressed the card to Jinger ;)


****check out these videos of how to make a shutter card - there are others on youtube, however so just do a search.  Much thanks to these two ladies for giving very clear instructions on how to make one.


Thanks for looking!

Thursday, January 6, 2011

A Home for Hello Kitty Card

A couple of days ago I posted a Hello Kitty shaped card (see pic above?)  so I decided it needs a special "home".  For  the card base I used the Wild Card cart and the letters and silhouette image are cut using the Hello Kitty Font cart.  After glueing the letters and the image, I was contemplating on how to best glue Hello  Kitty's eyes and nose.


 Luckily for me I guess the blade in my expression was not sharp so the little pieces did not completely cut through. I just flipped her face over and put glue ONLY on the pieces I wanted to transfer to my card.


Then I carefully placed the image on the card.  Using my Cricut tool that looks like a dentist's scrapper, I made sure that the pieces I wanted to transfer came off the image onto the card and lifted that image off.


And voila perfect placement of Hello Kitty's eyes and nose!


The backside was looking a little naked so I put two brads and made a strand of beads on a jewelry wire to close the card.  BTW the cardstock I used was double sided so I didn't have to cut a liner to dress up the inside.


Thanks for looking!  


Tuesday, January 4, 2011

Cricut Circle Challenge #14

Kids are back to school so I had time to play with my Cricut today.  For this week's Cricut Circle Challenge, the details are as follows:

Weekly Challenge #14: Getting In Shape!

According to polls, “getting in shape” is among the Top Ten Resolutions people make each New Year’s Eve. Let’s do it! Let’s start the New Year off right by getting in shape . . . a shape other than a rectangle. We challenge you to create a project in a shape other than a square or rectangle. Your project must also include a number somewhere and bling of some kind (to go along with this week’s theme of “Blinging in the New Year”!

One of my little niece's birthday is coming up in about a week and a half so I decided to make a card now since I have the time and she so loves Hello Kitty and purple (just like my daughter)!  I have had the Hello Kitty Greetings and Hello Kitty Font cartridges for maybe almost a year and a half now and have never really attempted to use either one, except maybe for the font.  The card I made ended up being 5.56 tall (yeah, that was kind of weird sizing but that's how it ended up since I wanted everything to fit in a 12 x 12 mat on my G).  I used the Hello Kitty Greetings cart for the card function along with its layers.  I found that the best way (for me at least) to assemble this card was to also cut out the silhouette feature along with the blackout feature for the base of the image.  This way you can kind of see where all the little pieces should fall in after cutting.  Hope the picture below shows what I'm talking about. The blackout and the silhouette cuts are both cut in black cardstock so it may be hard to see, but believe me it makes it so much more easier to piece cuts together.


The top part of the umbrella, the bow and the boots were run through the CB with the Plum Blossoms folder.  Then I added some irock gems on the bow (purple) and the umbrella (crystal).  Since my niece is turning 7, I cut out the number 7 using the tag feature from the Disney Mickey Font Cart, cut and layered at 1".  I had some old beads lying around so I threaded some through a strand of the jewelry wire I bought recently and hung the assembled tag to the card.

And here is the inside of the card with the sentiment stamped on and some faux stitching. 

Later this week I will attempt to make the envelope for this card.  Thanks for looking!

Monday, January 3, 2011

Wobble Envy


Happy New Year and happy Monday!  No contest entries for me these past two weeks but I did get some crafting done.  Made my first homemade wobble card - so happy with the result!  I saw a video a few weeks ago made by Linda Kaiser over at http://paperboutique.blogspot.com/2010/12/using-action-wobble-springs-to-add.html (direct link to her blogpost on making homemade wobble card) and wanted to try it so bad!  I was over at a local Joann's Fabric and Craft store last week to grab me some clearanced Christmas paper ($5.99 for a 180 page stack of 12x12 is awwwwwesome! - will save it for next Christmas!) and remembered to grab me some jewelry thin gauge wires. The spool I bought was 28 gauge.  I also got to play with my Imagine for a bit since it's getting neglected.  The card is sized A2. The teacup and the sentiment images are both from the Better Together Imagine cart.  The background paper was embossed with the Plum Blossoms CB folder (part of Asian Bundle), the thin brown cardstock on the side was punched with one of Martha Stewart punchers and blinged with blue irock gems.  I didn't have a plain circle puncher as Linda used in her project so I just cut out two small square pieces of white cardstock from my scrap as you can see below:


This was so much fun to make and I highly recommend anyone to try this - I know I will be making more since the spool of jewelry wire I bought was 40 yards - LOL!  I was literally giddy after I made this card (yeah, it doesn't take much these days to make me happy) everytime I wiggled the teacup image - so cute! Thanks for looking and happy crafting!