Too many crafting toys.....too little time to play :( Welcome to my blog diary! I started out with a baby bug (original Cricut), upgraded to other Cricuts, then playing with the Silhouette Cameo mostly nowadays. I also started dabbing into digi stamping and digital scrapbooking. Thanks for stopping by!
Search This Blog
Friday, November 12, 2010
Cricut Circle Magazine Challenge
Well, I wasn't going to play along because I didn't know what to make.....but see I have all these plastic casings from all the carts I have been amassing since purchasing the Gypsy a year ago.....
See what I mean? I'm a pack rat too and don't like to throw anything away. I have a box under my workstation with empty ribbon and empty ATG spools but I'm not going to bore you guys by showing it here :) So here are the details for the Cricut Magazine challenge over at the Cricut Circle Blog:
MAGAZINE ORNAMENT CHALLENGE!
We want to see the beautiful creations you can make with the Cricut, YuDu or Cuttlebug for your Christmas Tree.
Create something that is unique and wonderful, then share it for all to enjoy!
Contest Rules:
Project must be newly created and able to hang from your tree. You must use at least 4 Cricut cuts in your design and incorporate something from one other Provo Craft Product… like the YuDu, Cuttlebug or Knifty Knitter.
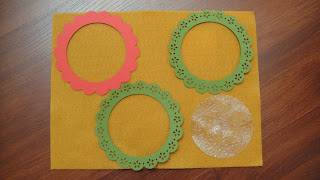
The ornament I've decided to make was super easy and cut from the Holiday Cakes cart. I set my images at 5 inches tall. I know this may seem like huge, but I have a 12 ft tall artificial Christmas tree that it's going to hang to once the hubby gets around to bringing all the boxes down from the attic. The 2 green scalloped circles were unaltered and the red scalloped circle was cut with the inside designs hidden using the hide contour on the Gypsy. The plain circle (plastic casing) was cut slightly bigger than the openning on the other 3 scalloped circles because I wanted it to show through the middle without falling off - it was also cut using the multicut function on the expression. Here is the pic after I have cut the images and the plastic circle already embossed with the Cuttlebug Large Snowflakes folder (one of the ones from the HSN bundle).
I attached the red image behind one of the green images then attached the embossed plastic circle behind them. I attached a piece of red thin ribbon to hold the ornament before I sealed the back with the remaining green image. I had to bling (not a requirement here, but just a ME thing) with my irock and gems and a red tulle for the bow. LOL my kids actually thought that the embossed plastic was a piece of glass! Not that you guys had a choice ;), but thanks for letting me ramble on and thanks for stopping by!
Subscribe to:
Post Comments (Atom)


7 comments:
Well I'm glad you decided to play because this is wonderful. I love the clear look (it's like cut crystal ).......lovely
TFS
Therese
This is adorable.What a wonderful idea to emboss the blister pack!! I am definitely going to scraplift this
Love it! Such a great idea.... You are not alone, I have been saving my cricut cart plastic as well! LOL.... This is a great idea to use them up. Love the way the embossing looks on it.
P.S. Thanks for visiting my blog. Love your work too!
Nicole
What a great idea and a wonderful way to use the acrylic. I really like this ornament thank you for sharing.
TFS, Here I have been throwing these away. Should know better than that. LOL
Beautiful! I'm so glad to hear there are so many of us who can't throw that sacred plastic away. Your project is great I love the snowflakes embossed in the acrylic.
Thanks for the nice comments, ladies! Means a lot to me!
Hugs, Melody
Post a Comment