Search This Blog

Saturday, December 31, 2011

Mya's door banner


My last project of the year!  My 6 year old DD wanted a banner for her room so with her help, we went to work ;) !  This project is actually a mixture of Cricut and Cameo cuts.  As I promised in my last post, I am really going to try to use both machines in all my projects from now on.  I am also linking this project as my first entry for the Silhouette Plus forum challenge to use something incorporating any image that we have gotten for free from Silhouette Studio. 

For this challenge, the base of the 3 pennants was one of the 51 free images I got for signing up to try Silhouette Studio before I decided to buy the Cameo.  The pennants  were cut at 11.525 inches and I was able to cut 2 from a 12 x 12 cardstock.  Another Cameo cut were the letters to my DD's name, Mya; I used a Word font called "creampuff" and used the offset feature  to create the shadow for each letter (so cool and easy to use feature!).  I embossed the letters with the Plum Blossoms CB folder and did faux stitching on the shadow with a white Sakura gel pen.  Then I put 3 flower buttons on each letter to embellish them.  I also added a homemade maroon crinkled ribbon to each pennant.  I did some real stitching on each pennant too using my sewing machine. 

The Cricut cuts I used for this project were (1) the flowers [CMTH Art Philosophy cart and Flower Shoppe cart], (2) vines [Wall Decor and More cart], (3) crown [Once Upon A Princess cart], and (4) roller blades [Groovy Times cart].  I used some irock gems on the crown and stuck a craft pearl on one of the flowers. 

Below are more closeups of each pennant.  My DD and I had so much fun using both machines! 

Thanks for looking and I wish you all a wonderful New Year!  See you next year ;)

Thursday, December 29, 2011

My First Cameo Card!

Hi there!   hope everyone had a wonderful Christmas and I wish you all a great 2012 ahead!  Sorry for the absence as I was busy with the family.  Didn't really get a lot of crafting done.  And as you probably have noticed in the title above, I have a new toy ;) - but more on that later.  This card is an A2 sized card and is a cut designed by Jamie Koay for Silhouette.  The Cricut Circle exclusive Sophie cart (which I still love!) have some very cute card bases that may be similar to this cut too. 

Here's a closeup of the card.

 I really didn't do much to it, as you can see.  I cut the image for the base in glittered cardstock by Prima, then inserted a moss green cardstock behind it after I embossed one side with the  Textile CB folder.  I added a home-dyed (I used the Distress reinker in tattered rose) crinkle ribbon, homemade stick pin, and attached pink half pearls to the flowers.  Then I cut a small strip of the glittered paper, punched one side with an MS puncher and attached that to the inside of the card as you can see below.
So why the Cameo when I have the Cricuts?  I love, love, love being able to cut fonts that are already in my computer for scrapbook titles that I can't seem to find in all the 200+ carts I share with my sister.  I have researched other electronic cutters that can cut computer fonts and other svgs (which I have a lot of from two years+ collecting) and some are either too expensive or too new in the market that they don't have enough reviews on them.  I decided to choose Silhouette for it's supposed awesome customer service, from other bloggers whose opinions I TRUST dearly.  I still plan on keeping all my Cricut products but I did make a deal with my DH that I will not be buying any carts for the next 4 months (Dear God I hope I last that long without caving!) when I bought the Cameo. One thing is for sure though....I will be more selective and use the carts I already have.  BTW Silhouette Studio store has awesome images that are just 99 cents or less.  I have also frequented svgcuts.com in the past and have recently discovered Lettering Delights for images that can be cut with the Cameo.  I think you may have to have SCAL (this is the one I have used in the past with my Expressions) or Make the Cut.   

I plan to show projects that include cuts from the Cameo and the Cricut in the future so stay tuned.

Since I don't have much room in my craft room I sat my Cameo on top of my Imagine as you can see below. 

I think these two will get along just fine ;)

Thanks for looking and have a wonderful day! 

Thursday, December 8, 2011

Simple Giftcard Tag Holder

Hello again!  I'm back to share a giftcard tag holder I created.  I don't know about you guys but the older I get the less tolerant I am of big shopping crowds - hence I didn't even try going out to the stores on Black Friday.  Maybe I may go Christmas shopping next week but for now I've decided I am handing out more giftcards this year.  I think my teenage niece and nephews appreciate it more anyway as they can pick out whatever they want. 

The base of the GC holder is from the CM Art Philosophy Cart.  I think it was meant to be a card tag but since I wanted to use it to hold a GC I had to weld two rectangles from the George and Basic Shapes cart to serve as flaps to make the pocket to hold a GC.  I used my Gypsy to accomplish this task.


Below is a pic of the cut out base with the flaps scored and folded in.


Before I glued the flaps to form the pocket, I attached a printed cardstock cut from George and Basic Shapes cart to the front.  Then I stitched the edges of the cardstock using my new toy, the Janome Sew Mini sewing machine I mentioned yesterday.  I'm still getting used to this machine especially the corners, but I'm happy to report that I'm loving it!


After I glued the flaps I then added a doily from the CM Art Philosophy cart, cut in gold shimmery cardstock and embossed with the Textile CB folder.  The tag is from the Cake Basics cart, stamped in white with sentiment and snowman from Studio G.  I added a homemade stick pin to one side of the tag.  I also used homemade crinkle ribbon, twine from The Twinery and a gold mini bell.

Here's another pic of the GC tag holder with a Coldstone GC to give you an idea how big this GC holder is.


Thanks for looking - I appreciate you stopping by.


Wednesday, December 7, 2011

My new baby!


Isn't she pretty?!  The FedEx guy dropped her off my house yesterday.  Well I have been saving up for this for a long time, thanks to all the enablers over on the Cricut MBs.  Some of you may already know that I made a pledge on the CC MB to Use My Stash and I have been pretty good at curbing my craft spending to things I needed for a particular project instead of buying on impulse - fell off the wagon :) a couple of times but overall I did pretty good (I think).   Special thanks goes to MamaC aka Carolyn for starting the thread.  The pledge ended at the end of November.  I used the money I saved to splurge on a mini sewing machine that a lot of crafters have been raving about.  I love love love the look of stitches on cards, home decor projects and LOs! I can't believe how tiny and  lightweight this little baby is!

This is a sample of the stitching I was practicing on 2 pieces of scrap cardstock.


I can't wait to make projects using this sewing machine!  If you are wanting one for yourself, I got mine online at Hancock Fabrics for $39.99 on sale.  They are regularly priced at $79.99.  Here's the link for it. 

Well I'm off to sew something - have a wonderful Wednesday everyone! 

Friday, December 2, 2011

3D Paper Ornament ala Sophie


Happy Friday bloggers!  Today I am sharing a 3D paper ornament I made for the CC Blog November Magazine Challenge.  For this challenge we were asked to create "something fabulous for the upcoming holidays" using one of our latest Circle cartridge Sophie. 

Now if you are not new to my blog you already know how much I adore this cartridge and have even mentioned in previous posts that it is my favorite (so far) of all the exclusive Circle cartridges.  However, (big gasp!) Sophie does not really scream Christmas-y to me LOL so it was a real challenge to come up with something for the holidays using this cart....but I'm happy to say that I was able to come up with something. 

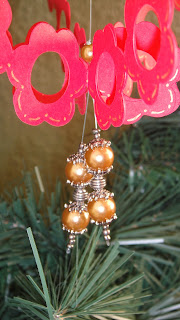
To create the 3D ornament base, I cut this flowery-looking "frame" called <Label6> on page 47 of the handbook at 7 inches; I cut out 6 of them in red cardstock. 

(LOL that dark brown fur to the left of the mat belongs to my 6 month old cockapoo Mojo)

Then I folded each in half (ignore the other cut on the left side of the pic below - it came from the negative cut of the frame/label and I have other plans for it).


Before glueing the pieces together, I stood them up roughly to see if I needed to add more cuts.  Since I wanted to insert something in the midde, I kept it at 6 pieces so the ornament would have 6 panels in all.  I glued the first 3 pieces together, then worked on the image that I wanted to hang in the middle before adhering the last 3 pieces together to close up the ornament. 


For the image in the middle of the ornament I used the Sophie <Heart1> image on page 29 cut at 3.5 inches using gold shimmery cardstock; I cut 4 of these for depth.  The cardstock was not shimmery enough for me so after glueing 2 back to back I took the other 2 and ran them through my Xyron 900 upside down so the glue is in the front.  Then I sprinkled some fine glitter on them before I adhered them to the other two using foam mounts. 


Oops almost forgot to mention that I inserted a strand of this clear plastic thread in between the first two layers of the heart, long enough so I can hang it in the middle of the ornament, and also be able to hang something at the end later.  (I don't know exactly what the plastic thread was used for but here's a pic of it below - I have had this thing for years and at 550 yards seemed a great price for just  $1.49!)


After the heart image is ready with the plastic thread, I attached  to the first 3 pieces of the base of the ornament before I went ahead and closed up the ornament with the last 3 pieces of the base.  I added a small gold faux pearl to hold the plastic thread in place on the top, and then another one on the bottom to hold a shorter plastic thread.  

For the snowflakes, I used the Sophie doily image <Snowflke> on page 55, cut 12x in white shimmery cardstock at 2 inches.  While the snowflakes were cutting in the E2, I went to work on the beads for the bottom of the ornament.


For added bling, I attached an irock gem to each snowflake before attaching them randomly to each of the 6 panels of the ornament base.  I used foam dots to attach 2 snowflakes back to back per panel. 


To finish off the ornament I cut the <Holly> and its layers from the Winter Woodland cart, cut at 2 inches, to dress up the heart image in the middle for the holidays.  I cut 2 of the Holly image, one for the front and the other for the back of the heart image.  I embossed the leaves with the Script CB folder. 


I just love those beads hanging on the bottom! 


View from the top with the ribbon to hold the ornament up.


And the best part is......this 3D ornament stores flat after the holidays so I can use it again next year!


Thanks for stopping by and have a fabulous weekend! 

Thursday, December 1, 2011

Just Us Girls LO


First and foremost, thanks so much for stopping by today ;).  I am linking this project to the CC Blog Weekly Challenge with the theme "Flower Fusion."  We were asked to incorporate purchased flowers into our projects.  I chose to make a double LO to cut down on the LOs I'm so behind in ;).  The pictures were taken in 2008 when my then 3 year old DD and I were babysitting my newborn niece Emma.  My DD loved "babysitting" her little cousin - made her feel like a big girl!


The title "Just us girls" were cut from the Hello Kitty Font cart, with the top layers embossed with the D'vine Swirls CB folder.  The border on the right side of the second page is from the MS Elegant Cake Art cart.  I embellished the border with some flowers I purchased from Oriental Trading Company 2 years ago.  I glued different colored buttons in the middle of each flower.  The other border (just peeking behind the pictures on the first page) was just a strip of white cardstock punched with a MS doily puncher on both sides then embellished with a strip of ribbon.  The mats for the pictures were cut to size using Fiskar scissors, some decorated with the same ribbon as the white border strip.  


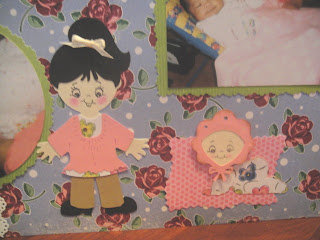
The big girl doll was cut using the Paper Doll Dress Up cart and the baby doll was cut from the Everyday Paper Dolls cart; both dolls were stamped using Peachy Keen face stamps.  The journaling was computer generated.

Have a wonderful day everyone!