Search This Blog

Wednesday, June 27, 2012

The same but different flip swing cards


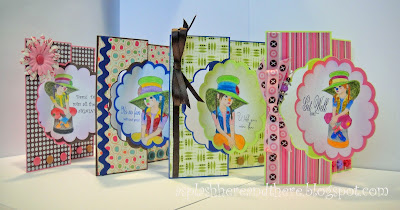
Wow it's been a while since I posted!  The kids have summer vacation which means less time for me to craft :(   Anyway, part of this post can also be viewed over at the Scrapper's Delights Papercrafts Blog.  Thanks Janice for letting me post in your blog today.  For this project, I made 4  A2 size cards.  The base of the cards is a flip swing card image by Lori Whitlock I purchased through the Silhouette Store, cut with the Cameo.  I chose to play with the Tears of a Clown digi set 2 which came out I believe in May.  I also incorporated some of the digi kit elements from the Scrapper's Delights' Forever Blowing Bubbles digi scrapbook kit.  I imported the digi stamps onto the Silhouette Studio to size them according to how big the coordinating scalloped circles were going to be.  I colored the clown digis with Prismacolor pencils.

Below are some images after they have been cut in the Cameo (I'm using a 12 x 12 Cricut matt because you can with the Cameo).


And here are closeups of the cards.

Card #1

the flowers on a string is from SD's Forever Blowing Bubbles
digi kit; I used the Curlz MT font for the sentiment on the
front and on the inside of the card; I embellished with Card Candis
and Prima flowers

Card #2

for this card I embellished with a wavy ribbon and buttons
from my stash.  I used the Abbeyline, Arial and Chopin Scripts
for the sentiments.  The flower on the inside sentiment is from the
SD's Forever Blowing Bubbles kit

Card #3

The heart ribbon image is again from the same SD digital
kit.  I used the Abbeyline font for the sentiments, and embellished
with Card Candis and brown ribbon

Card #4

the sentiment in the front came from the Tears of a Clown
digi set; I used the Curlz MT font for the sentiment inside the card,
then embellished with a ribbon, a homemade stick pin, and some
flower buttons.


Hope you like my project for today.  Thanks for stopping by and hope you all are having a wonderful summer.  

Thursday, June 14, 2012

Card Patterns #169 - Sweet Birthday Wishes


Busy summer for us but I finally did get a few moments to play along with Card Patterns blog.  The sketch pattern we are to follow is below by Michelle Bertuzzi, and is sketch #169.  My card is an A2 size card and all cuts and patterned papers used were from the Silhouette Store and were cut with the Cameo.


I imported the jpg image of Michelle's sketch onto the Silhouette Studio so it was easier for me to refer to it while designing my card.  The digi image I used for the front of my card is one from Polly Crafts (you can click on the link, but her store is closed down).  I added the sentiment "Sweet  birthday wishes below the digi stamp image using the Before the Rain font, then drew a circle cut line around the image and the sentiment, matching the size of the circle in the doily cut.  I used elements from the Scrapper's Delights' Morning Dew and the Nature's Little Wonders digi kits for the images for the inside of the card.


Then using the print and cut feature, I "peeled" the pieces of my card and put the images I wanted to be printed and then cut onto the same matt.  I used my wide format printer to print the images below on a 12 x 12 cardstock.  For the solid colors, I used my scraps of cardstock (why waste precious printer ink, right?). 


After the images printed, I was ready to cut, so I put the printed images onto my cutting matt (I'm using a Cricut matt here, cuz well....you can with the Cameo!). 


The pieces after the cuts and before assembly.  I used my Prismacolor pencils to color the Polly Craft fairy image.

 Closeups of the card after assembly.


Thanks for stopping by!

Saturday, June 9, 2012

Let's pop out of here!


Yesterday was my kids' last day of school - phew!  No more getting up at 5:30 in the morning for a couple of months!  I don't know about you guys but I am going to enjoy being in my jammies until 11 am (or later) for at least a couple of weeks until the kids start summer day camps (gotta keep them busy!). 

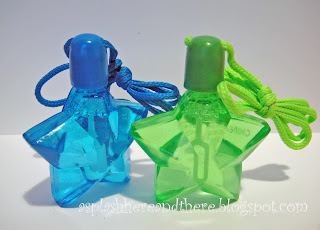
I wasn't going to get anything for my kids' classmates because I'm exhausted and this past school year had been packed with so many field trips!  And then I was scouring the Target bargain bins and came across these cute star bubble bottles - my local Target has started getting the Independence Day stuff out.  Well I couldn't help myself from getting a bunch for the kiddos to give out on their last day of school.


 I used a couple of tag images from the Silhouette Store and used the Gabriola and Sixties for fonts.  I also used a bubble cluster digital image from the Forever Blowing Bubbles kit from Scrapper's Delights.  Below is a screen shot of the images on the Silhouette Studio.  I used the print and cut feature of the Silhouette Studio to cut the tags with the Cameo. 

 Hope you can see the bubble clusters behind the sentiments. 

And here are the pics of the finished bubbles with the tags.

The ones for my son's class. 
 I made a total of 17 with this design.


These are for my daughter's class. 
I made a total of 13 with this design.

These were very easy to decorate in a flash and soooo inexpensive!  They were such a hit with the incoming 2nd and 4th graders as they blew and popped those bubbles at dismissal - what a fun way to start the summer vacation! 

Hope you all have a wonderful summer!

Friday, June 8, 2012

Don't answer that!


Well I've never done this before, but this is sort of a backwards kind of post - read on and scroll down and the sentiment above will all make sense ;).  This was kind of fun for me to do.  I'm also linking this to the Polly Craft blog going away linky party. 

This is a closeup of the sentiment in the front.  Click on the image to
make it bigger so you can see  more clearly what it says

And this is a pic of the front of the card with the envelope

This card is 5x5 and is for my DD's 1st grade teacher.  My DD's teacher and I have always made jokes about how so different my kids are (my son had the same teacher in 1st grade) so she'll appreciate the humor on this card.  The digi is again one of the ones I got on the digi bundle I recently purchased from Polly Craft, called Farmin' Apples (from Celeste Amberglow line) and is colored with Prismacolor pencils, then cut with nesties.  The tag was purchased from Silhouette store, cut with the Cameo.  The sentiment in the front is written using one of the fonts in my library (I'm so sorry I don't remember which one), printed onto the top tag layer in my printer then cut with the Cameo using the print and cut feature.  I added some flower buttons, twine and faux stitching with gel pen. For the inside of the card, I added a digital element (the flower and ribbon) from one of the kits from Scrap Girls.  The envelope was an image purchased from the Silhouette Store. 

Hope you like my project today.  Have a wonderful weekend!  

Thursday, June 7, 2012

Cheers!


So I popped over at the Cricut Circle MB this week, which I hadn't done in a while since I've been busy with digital scrapbooking forums - and I'm glad I did!  Sweetpea1030 has posted that Polly Craft is closing down this week!  I mean I hadn't heard of this site before but she has a lot of very cute digis!  I grabbed me the bundle and some (hehe!) for a good price.

The image on this card is one of the ones from the bundle I bought and is called Taking a Break from the Swings and Slides line.  This card is 5 x 5 and I kept it pretty monochromatic (I'm really bad at this) and I'm entering it in Enfy's Going Buggy blog challenge this month.  I'm also linking this at the Polly Craft blog as sort of a farewell linky party; wish I had known about this site before but I'm so glad I got some of Paula's very cute images before she closes down her digi store for good :(

After coloring the image with my Prismacolor pencils, I cut the image out with a Nestability die and then chalked around it with a light brown chalk.  The sentiment "Cheers" and its shadow were cut with the Cameo; the font I used was Ravie, which is already in my computer. 

I kept the inside plain, but did use a strip of left-over patterned cardstock to dress up the top a bit.  This card will be for my son's 3rd Grade teacher and I'm going to let him address the inside sentiment himself. 


I can't wait to color more of the Polly Craft digis in the bundle I bought - so stay tuned!  Thanks for popping over here today!

Wednesday, June 6, 2012

Hey Big Guy!


Today's project can also be viewed over at the Scrapper's Delights Paper Crafts blog.  Thanks Janice for allowing me to post over on your blog once again.   It's an easel card that's a little over 5 x 5 and is for my hubby.   It is also highlighting one of Scrapper's Delights' new set of digis.  I chose to play with the motor bike digis and you can get it here.   I also decided to add a png format image from one of the Scrapper's Delights kit called On the Wings of Love.  It's no secret that I just love combining digi stamps and elements from different digital kits with my paper crafts.

Here is the matching envelope I sized to fit the card.

front of the envelope

back of the envelope

I used the Silhouette Studio to plan my card.  I imported the motor bike digi and the digital elements from the On the Wings of Love  kit onto the Silhouette Studio to help me plan where to put the images and how big to size them.  Since digi stamps and elements from digi kits are either png or jpg formats, they will print using your printer, but they will not automatically cut around the images; you would need to use the trace feature on the Silhouette Studio, then use the offset feature to create a shadow  around the images that would serve as the cut lines for your Cameo to cut.

For the front of the card, I chose to add a fairy from the On the Wings of Love kit to sit on the uncolored motor bike digi image (I could have used a colored motor bike that also came with this set but I wanted to challenge myself and color the image with my Prismacolor pencils).  After doing a trace and creating the shadow for both images, I sent the images to my printer.  Then I laid the cardstock onto the cutting matt for the Cameo to cut around the images. 

(pardon the shadow - that was me taking a picture late in the night)
The registration marks helps tell the Cameo that this is a print and cut job.
I printed two because I wanted to popdot one on top of the other. 

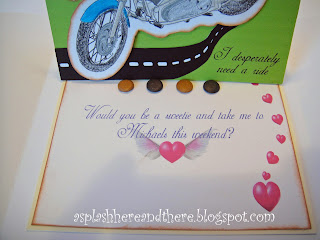
The other die cuts on the card are images purchased from the Silhouette Store (the envelope, the elements to the scene and the plank)  I used the Adine Kimberg Script and the Before the Rain fonts for the sentiments.  For the envelope I added another motor bike image to the front - this one comes already colored in.  For the back of the envelope I added the heart on wings images, again from the On the Wings of Love kit, to the flaps.  The same heart on wings image can also be seen on the inside of the card, layered under inside sentiment.  Another element I used for the inside of the card from the kit is the cluster of hearts. 

Here are some  closeups:


I used Card Candis by Craft Works Cards to help tuck
the front of the card up for the easel effect.

 
I hope you liked my project today and inspires you to make something for that special man in your life.   Thanks for stopping by!  

Sunday, June 3, 2012

Creative*Thoughtful*Dedicated Canvas Wall Hanging


Hi there!  Today's post can also be viewed over at the Bug Bytes Blog.  Thanks Pam for allowing me to post in your blog ;) again.   This project is highlighting three of things I love most about my 9 y o DS (there are other things I love about him, of course). 

The project I'm sharing today is a canvas wall hanging, inspired by a file I purchased through the Silhouette Store, and is by Lori Whitlock.   For instructions on how to make the canvas wall hanging, please click on the link as there really wasn't much I could have done to improve on Lori's instructions (thanks Lori!)   http://www.youtube.com/watch?v=DIRgnP3cZFA  or go to her blog.  In her video tutorial she made a two-panel wall canvas but she did talk about how to make a three-panel one, which you see I have done here.  I also added some beads to my ribbons in between the panels and on the top.   

For this project, you would need to assemble the canvas pieces and attach the ribbons,  but do NOT attach the front panels yet until you have decorated them.


This project was planned completely using the Silhouette Studio and all die cuts were cut using my Cameo.  I love that I can even color in my pieces to help me plan the colors for my project!  I was even able to import pictures on the Silhouette Studio and size it to fit the frame I was going to use.  Below is a screen shot of I envisioned the pieces to look like with all the layers colored and stacked together. 


And here are the pieces all cut out and some pieces semi assembled.  I used my printer to print the matt for each panel, then sewed them onto the black front panel for added texture.


For the title on each panel, I used the Chopin Script, Fontleroy Brown NF, and the Henry Morgan Hand fonts, already in my computer.  I used the offset feature on the Silhouette Studio to create the shadows for the title. 

Below are closeups of the panels after they have been attached to the front of each canvas.  I used my gel pens for some details and for faux stitching on the titles.  Other embellishments added were metal findings for my son's name, green ribbon, buttons, Card Candis, hemp cord and sticker gems. 

my son loves to draw and color/paint and has such
an active imagination

siblings will fight, but deep down he loves his sister so
much and is very considerate to her, and to others too

there were times he didn't want to go to his tae kwon do classes,
but he never did once told us he wanted to quit.  He finally
got his first degree black belt last year at the age of 8 and wants
to get his second degree black belt. 
We are so very proud of him!

 
Thanks for letting me share this project with you today and thanks for stopping by!