Search This Blog

Thursday, February 10, 2011

Cherish Garland Banner


I'm having so much fun with my Expression this week!  Here is my entry for the Cricut Circle Blog Monthly Challenge.  We were asked to make a banner of any kind we like and this is what I came up with.  I have a wall in my family room that has been blank for 5 years (yikes!) except maybe for the paint job :).  Anyway, I am slowly putting up pictures on the walls so that the kids can see more current photos of themselves since I am almost 3 years behind in scrapbooking and a pretty little garland banner is just perfect for this.  BTW the picture frames here were purchased from Target last summer - they accommodate 3 pictures each with horizontal orientation.  I did a somewhat similar hanging frame to accommodate my vertical pictures which you can see here.

For this project I used a 6 ft. garland I purchased from Michaels to hold the banner pieces.  I chose a garland so that I can use it over and over and just change the banner pieces if I so chose later.  I foam mounted the butterfly border images, the circle doilies and the letters.  Each scalloped triangle base is 8.5 inches tall.


I also added doodling on the edges of the scalloped triangle pieces, then puched each two corners so that I can thread ribbons to attach each piece to the garland.  I wanted to use pretty eyelets but didn't have ones that are big enough, so I just used hole punch reinforcers (is that even what you call them LOL?) on the backs so that the paper does not tear when I put the ribbons through. 


View of the back with reinforcement.


Details of the garland banner:
* 6 ft garland from Michaels
* Scalloped triangle from Tie the Knot cart
* Triangle from Tie the Knot cart using hide contour feature, also inked all around for depth
* "Cherish" cut and the shadow for each letter from Storybook cart
* Circle doilies from Lacy Labels cart
* Butterfly border and shadow from Stamping cart
* Doodling on scalloped triangle with blue gel pen from $1 section at Target
* Ribbons from Michaels
* Irock gems on the letter cuts

Thanks again for looking!

Wednesday, February 9, 2011

Freeze Dance LO


Hello again Cricuteers - Circlets and non-circlets - we're all family of wonderful crafters!  I am playing catch up with my LOs so I was excited to finally do another 2-page LO to enter yet another Cricut Circle Blog Challenge - haven't won yet but I'm loving the weekly challenges as they force me to use my cricut products. I TRY to enter each week just to stay crafty. This week the theme is "Whatevah!" and the details for challenge are as follows:

Weekly Challenge #19: Whatevah! Challenge
“Whatevah!” is a phrase a lot of parents of teens hear around their house on daily basis. We thought we’d take that phrase to heart for this next challenge. What we’d like you to do is use WHATEVAH shape you would like, but be sure to repeat it three times on your project. Project must also include spray ink and must be newly created for this challenge.

I chose to repeat one of the musical notes but varied its size.  You can see one of them on the left side of the LO and the other 2 on the right side of the LO.  I was also able to finally use my homemade glitter mist. 


Details of my LO:
* 2  12x12 page LO
* irock gems on girl cut's dress and ponytail, and the boy cut's suspenders
* Cricut cuts used:  5 musical notes (1 repeated 3x) from Hannah Montana cart; "Freeze Dance" from Hannah Montana cart; girl dancing from Nifty Fifties cart; boy dancing from Nifty Fifty cart
* D'vine Swirls CB folder to add dimension in girl cut's skirt and top

Thanks for looking and keep crafting!

Tuesday, February 1, 2011

Hanging Picture Frame

Hello bloggers!  Hope everyone's having a wonderful day.  Just a quick post today and it's my entry for the Circle's Weekly Challenge.  As you can see it's a hanging frame for 2 4x6 pictures.  Rules for the CC Challenge are as follows:

Weekly Challenge #18: Back to the Basics Challenge!

For this challenge we want you to go “Back to the Basics” . . . by using ONLY the cartridge(s) that came with your machine or Gypsy! You must use THREE cuts on your project (the complete title or words counts as one cut). We can’t wait to see what you come up with!

Details of my project:
*from Gypsy Font cart - frames
*from Gypsy Wanderings cart - swirly image and shadow, "Smile" and its shadow, flower cuts
*lots of foam mounts
*buttons, twines, and ribbon from my stash


Thanks for looking! 

Tuesday, January 25, 2011

Cricut Circle Monthly Challenge


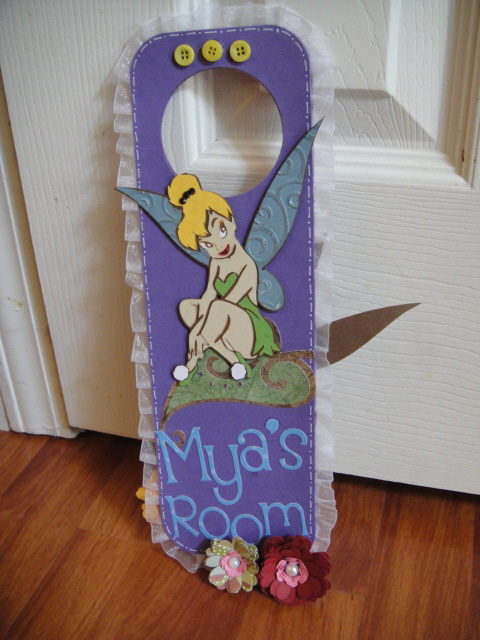
This is my entry for the Cricut Circle Challenge.  We were supposed to scraplift one of the projects that was done by one of the Circle Blog Designers and put our own twist to it.  There are so many awesome designers at the CC blog that it was hard to choose just one so my daughter sort of chose one for me to copy - she wanted a sign for her door to keep boys out of her room.  (Now my son wants one too to keep HER out of his room - but we'll get to his sign hopefully later next week)  In addition, we were to use products from at least 2 of the blog's sponsors. 

Below is the inspiration that I scraplifted.  It was a door sign created by Jana Eubank on December 15th, as posted in the blog.


I wanted to make the door hang sturdy but I didn't have any chipboards, so I just went ahead and cut the door hang image using regular cardstock and layered them for thickness - so thrilled to be able to use my new Xyron 900 Creative Station for this job!


I cut a total of 6 door hang images, again for thickness.  After stacking the first three together, I proceeded to put the sheer ribbon around the edges before I stacked the other three layers.  


BTW if you've never cut Tinker Bell, do NOT cut her any smaller than 6 inches - darn Tinker Bell almost brought me to tears to assemble, I kid you not!  

Here's another look at the double sided door hang.


Here are the details of my project:
* Products from blog sponsors - Irock gems on Tinkerbell's hair and on the leaf cut, and Bazzil Basics Paper for the door hang image cuts
*Cricut cuts used - Tinker  Bell (front and back of door sign) and her layers, as well as the leaf and layer  from Disney - Tinker Bell & Friends cart, "Mya's Room" and "Go away!" letters cut from Alphalicious cart, door hang from Tags, Bags, Boxes & More cart
*buttons from my stash
*white sheer ribbon from the dollar store
*half pearls from Michaels
*flowers made using Cuttlebug Quilling kit
*white Sakura gel pen for the faux stitching and the whites on Tinker's eyes
*D'vine Swirls CB folder for texturizing Tinker's wings
*Star Dust Ranger Stickles to bling her wings
*butterfly is a 3-D sticker from K & C
Thanks again for stopping by and have a wonderful week!  

Tuesday, January 18, 2011

Oh, Baby!


Here is my entry for the Cricut Circle Challenge #16.  This week's theme is "Cute as a Button" and the rules are as follows:

Weekly Challenge #16: Cute As a Button Sketch Challenge!

Babies are definitely “cute as a button” with their sweet little faces and tiny features. In honor of our Baby Theme, this week we challenge you to create a SCRAPBOOK PAGE or CARD using the sketch below. Your project doesn’t need to follow the sketch exactly, but it should be apparent that you used it as inspiration. Feel free to turn it on it’s side or move elements to fit what you are doing. In addition to using the sketch, we also want you to incorporate STAMPING and BUTTONS (of course!).


I must admit I did go button and twine crazy with this challenge LOL!  I have a container-full of buttons I wanted to get rid of before I go buy more.  The card I created was 6x6.  Just realized that I used 6 different carts to make my card - wow that's so unlike me - but proud of myself for using more than 2 carts in a project!  It is so easy with the help of my Gypsy!

Here's the inside of the card - the coordinating paper on the bottom was punched with one of MS punchers. 


Card details:
- carts used:  MS Elegant Cake Art cart (scalloped strip); George and Basic Shapes cart (rectangle piece on top of scalloped cut); New Arrival cart (Baby); Stamping cart ("Oh Baby" sentiment); Mother's Day Bouquet (flowers and leaves); Simply Charmed (baby bottle)
- Stamps used:  Peachy Keen PK-493 Everyday Character Face Parts and More! for the baby's face(I haven't used my PK stamps in a while!); American Girl crafts stamp set for the 2 hearts; an old foam stamp for the inside of the card "Hip Hip Hooray". 
- Cuttlebug folders used:  D'vine Swirls (leaves), Swiss Dots (bottle), and Plum Blossoms (rectangle piece)
-and of course lots of buttons (10!) from my stash

Thanks for looking and have a wonderful week!

Tuesday, January 11, 2011

Giving Jinger My First.....


....tri-shutter card ever!  I have always wanted to make one but have always been very intimidated so I watched a bunch of videos of crafters sharing their tricks on how to make one on youtube.  I will share the videos I've watched below this post. 

So here is my card entry for the the Jinger Adams FB page contest.  Jinger, the spokesperson for Cricut is helping launch a new product on HSN on January 20th and is holding a contest for Cricuteers to send in a card with any or all of cuts from Don Juan, Winter Lace and Wall Decor and More carts.  Another criteria is to incorporate anything from Anna Griffin.  I must admit.....I didn't have any of Anna Griffin stuff so I headed over to my local M's yesterday.  All I could find was a stack of paper  from her "Isabelle Collection."  At first I wasn't feeling the vibes on this stack because all I could think about was "Diwali" (for those who don't know, it's the Indian New Year) colors LOL and I really wanted to make a card to dear Jinger for all her hard work.  In the end I was pretty pleased with the result - and I made my first ever tri-shutter card!  A little pain to make but I think with practice I could get the hang of making more in the near future.

Card details:
- base of card is from Recollections in moss green
- patterned paper from Anna Griffin "Isabelle Collection" pack
- brown cardstock to layer the patterned pieces
- sentiment is computer generated printed on white cardstock and cut out with circle Nesties and then chalked to match Anna's patterned paper
- scalloped circle cut from the same "Isabelle Collection" pack using scalloped Nesties
- flowers are Prima
- half pearl on flowers is from $1 section at M's
- blings are irock
- ribbon strands by American Crafts
- Cricut cuts from Wall Decor and More cart (coffee mug and layer, garland and mugs, and heart)
- faux stitching using white and granite Sakura gel pens
- envelope cut from Wild Card cart - not a requirement but I don't like to give a card without an envelope :)
- brads from my stash

Another look at the card from the inside - yes, I addressed the card to Jinger ;)


****check out these videos of how to make a shutter card - there are others on youtube, however so just do a search.  Much thanks to these two ladies for giving very clear instructions on how to make one.


Thanks for looking!

Thursday, January 6, 2011

A Home for Hello Kitty Card

A couple of days ago I posted a Hello Kitty shaped card (see pic above?)  so I decided it needs a special "home".  For  the card base I used the Wild Card cart and the letters and silhouette image are cut using the Hello Kitty Font cart.  After glueing the letters and the image, I was contemplating on how to best glue Hello  Kitty's eyes and nose.


 Luckily for me I guess the blade in my expression was not sharp so the little pieces did not completely cut through. I just flipped her face over and put glue ONLY on the pieces I wanted to transfer to my card.


Then I carefully placed the image on the card.  Using my Cricut tool that looks like a dentist's scrapper, I made sure that the pieces I wanted to transfer came off the image onto the card and lifted that image off.


And voila perfect placement of Hello Kitty's eyes and nose!


The backside was looking a little naked so I put two brads and made a strand of beads on a jewelry wire to close the card.  BTW the cardstock I used was double sided so I didn't have to cut a liner to dress up the inside.


Thanks for looking!