Search This Blog

Tuesday, September 24, 2013

Thank you for all that you do


These are a set of thank you cards I've recently created to replenish my stash - you can never have too many thank you cards, right?  I'm linking this project over to the Silhouette Challenges blog for their "welded letters" challenge.  Designed on the Silhouette Studio.  The cards are A2 size, and the base is by Lori Whitlock (Design ID #44886).  All patterned paper mats were flood-filled with digital paper purchased from the Silhouette Store.  The font I used for the "Thank you" was Ravie font (I ungrouped the letters then spaced them to my liking and welded some of the letters together), while the "for all that you do"  was done is Arial font (print only). 


Here's a peek at the inside, which I kept plain - ready for me to personally address later.  I used the internal offset feature to create the inside mat.  I let the Silhouette Studio faux stitch for me.  The ribbons were from my stash (purchased from Michaels months ago).
 

Thanks for stopping by!


Thursday, September 19, 2013

Oopsie my bad!


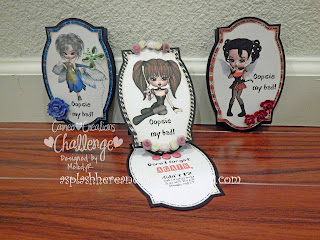
Hello there bloggers!  Today starts a new challenge over at the Cameo Creations Challenge blog and the theme is patterned paper - so go ahead and whip out your favorite pattern (or patterns) anywhere on your project and link up with us.  Since I am not very good at combining patterns for the most part, my project contains 3 different patterns from the Silhouette Store onto 3 different cards.  As always, this project is designed using the Silhouette Studio, images printed on my faithful home printer and cut with the Cameo.

The easel cards stand at 3.540 x 5.345 inches when folded up.  The shape of the card is based on one of the set of 12 tags by PPbN Designs (Design ID #44045).  I used the offset and the weld features on the Silhouette Studio to create all the coordinating layers for the card to create the easel effect.  For the images, I used pre-colored (cuz I seriously stink at coloring ;) ) digis from Scrapper's Delights Store - I used to do Guest Design Team work on Janice's blog and still loooove her images. 

Below is a screen shot of the images in the Silhouette Studio.  The digis were in png format which means they have a clear background and so they're very easy to size them to fit your project.  The sentiments were created using the Cartoon font from my library.

 
after printing from my home printer, I load the page
(yes, you can use a Cricut mat on the Cameo)
onto the Cameo - the 3 registration marks will
guide the machine where to cut. 
 
after the cut

I used the offset feature of the Sil Studio to create  mats for the images, then flood filled each with the patterns purchased from the Silhouette Store (from top to bottom, candy cane grunge, blue diamond snowflake, and black stripe, respectively).  I let the Silhouette Studio faux stitch the mats for me. 


And here are some close-ups of the finished project, with some flower embellishments. 


I'm bound to forget someone's birthday so at least I'll have a card to attach to a late gift ;).  For the inside sentiments, I used the Cartoon, Horseshoes and Lemonade, and Cajun Boogie fonts. 


 Thanks so much for looking and I look forward to seeing what you link up with us at the CCC blog. 
 
Also linking to the following challenges:
 Scrapper's Delights - Challenge #7,  Birthday Inspiration
Old Backporch -  52 card pickup  


Monday, September 9, 2013

First Communion Bookmarks


Hi there!  Today's my day to share a project over at She's a Sassy Lady blog.  Thanks Sheila for having me over once a month.  My 8 year old DD had her first communion a few months ago, and although I shared with you all here how we created her communion banner, I have never shared the little gifts she gave her close friends who also had their first communion at the same time. They are little bookmarks to go along with the first communion books she gave her friends.  This project was designed using the Silhouette Studio and all cuts were done using my Cameo.

The base of the bookmarks were actually banners by Lori Whitlock (Design ID #25737).  With a little modification, I mirrored the banners (straight edged for the boys and scalloped for the girls), welded two together and created perforated lines and holes.  Below is how the bookmarks looked in the Silhouette Studio.  I also let the Silhouette Studio do the faux stitching for me. The fonts I used for the sentiments on the bookmarks were those already in my library (downloaded free - just googled "free fonts").


Below is how the girls' bookmarks look printed in pink cardstock.  (I used green cardstock for the boys).  The registration marks on the three corners on the page will tell the Cameo where to cut once I put the printed page on the mat.


Here's a look after the Cameo has had the chance to cut.  I just love having the Silhouette Studio do the faux stitching for me ;).   The boys' bookmarks had a different style of faux stitching.


I wanted to attach some beads with each of the kids' names and wanted it to be sturdy so I put some eyelets where the holes were.


After attaching the beads to the bookmarks, I attached magnets to the insides of each bookmark.


And here are some closeups of the finished bookmarks.

front of the bookmarks with the kids' names in beads
 
the back of the bookmarks says "from your friend, Mya"
 
Hope you like this project.  Thanks for looking and "see" you all again soon!  Thanks for having me over, Sheila ;)!

Sunday, September 1, 2013

Double Digits


Hi there!  It's my turn to post over at the Bugbytes blog!  Thanks Pam for letting me share my projects once a month with your readers.  I created this card last week for one of my nephews who turned 10.  This card is 8.25 x  5.25 inches, was designed using the Silhouette Studio and all cuts were done on the Cameo.

A few weeks ago, Silhouette Store had a sale on all its licensed characters, so I was able to buy (I have a subscription) a lot of Looney Toons characters, Harry Potter and Justice League character images, most of which were print and cut.  You could also find images on the web and import onto the Silhouette Studio.  Below is a screen shot of the card design on the Silhouette Studio.


And below are the cuts after printing the images in my printer then cutting with the Cameo.  I used the Happy Sans font for all the sentiments, flood-filled in blue and made sure they were set to print only.  I also included a Taz image (I turned it into sketch so it may look a little "blurry" on the screen) to print on the envelope to match the card.  I even let the Silhouette Studio do the faux stitching for me.


And here are closeups of the finished card with the envelope. The two strips of narrow ribbons behind Bugs Bunny were from my stash.  Bugs Bunny was mounted on foam tape for some dimension.


Thanks for looking and I'll see you again soon!