Search This Blog

Monday, May 20, 2013

Sympathy Card


I usually don't make sympathy cards because it saddens me too much to have to make one so I normally just buy them when I need them.  This is the very first one I've ever made for a dear friend whose dad recently passed away.  Hope she likes it. 

The card is 5x5 and designed with the Silhouette Studio and all elements (purchased from Silhouette Store) were cut with the Cameo.  The main image is of a (fall) bird on a branch by Lori Whitlock (Design ID #33055).  I chose to turn the main image into a sketch image in green ink, then used the knife function in the Silhouette Studio to cut the bird image from the branch, ran that through the Cuttlebug using the Swiss Dots folder and attached it to the card using some foam mounts for some dimension.

This is how the card looks like with just the sketched image
and some ribbon.  I used Choppin Script font for the outside sentiment.
 
And this is after I attached the bird image.
 
Close up of the bird with the sticker gem for his eye.
 
Here's a couple of closeups of the inside of the card.  I used the print and cut feature of the Silhouette to do the inside faux stitching for me.  I used the Abbeyline font for the inside sentiment.  The swirl image on the left side is an image by Rivka Wilkins (Design ID #7983) which I turned into a sketch in brown ink.
 
 
close up of the sketched image and faux stitching
 
The envelope I used was an image by Alaa' Studio (Design ID #42058).  I just added some narrow slits because I wanted to thread a strip of matching ribbon.  I used the same ribbon as the one I used on the card because the back of the ribbon was plain black. 


the liner was easy to make using the internal offset then the knife
feature to cut off the parts I didn't need. The coordinating liner nicely
covers the ribbon. 
 
I am linking this card to the Old Backporch 52 card pickup and over at the Eclectic Ellapu (Anything Goes theme).  Thanks for stopping by today and have a wonderful start of the week. 


Monday, May 13, 2013

"U want 2 take me on?!" mixed digital double page


Hi all!  This post can also be viewed over at She's a Sassy Lady blog.  Thanks Sheila for allowing me to share with your readers once a month.  Today I'm sharing a couple of digital scrapbook pages I've been working on.  I refuse to skip years (I'm anal that way LOL!) in my scrapbooking, but since I've been so busy with other things I've been really behind.  These pages include pictures from 2008 (I know, sadly that's how behind I am).  I used the Creative Memories Storybook Creator 4 to create my pages, although at times I use the MyMemories Suite V4.  I have been fortunate to have a wide format printer (Epson Artisan 1430) so I print my own pages after creating them.  The picture above shows the finished pages, all ready to be inserted in their page protector sleeves in my 12 x 12 album. 

If you haven't tried digital scrapbooking, I highly recommend it.  What you see is basically what you print later, and you can basically layer to your heart's content, much like traditional scrapbooking. You can use a pre-designed layout, or you can create your pages from scratch, like I did here.  You don't really have to have your own printer either - there are other printing services other scrappers use, including Costco.  Or you can just choose to share your pages online too - totally your preference.  I like to have my pages in a regular photo album as is, or sometimes I add embellishments such as die cuts, ribbons, buttons, etc., much like I'd do in a traditional page.

Below are screen shots of my pages in the CM Storybook Creator.


The right side of the screens show you what pages I was working on. 
I like that I can switch back and forth from one page to another when
 I hit a creative block.  This way my unfinished pages are not cluttering
my craft table.   

After I'm done with the pages and ready to print, I make a .jpg copy.  This just allows me to to import my finished digital pages onto my Silhouette Studio, just in case I want to add a die cut or two.  This way I can size the die cut/s exactly how I would want it/them to look on my page. 

Here are my two finished digital pages side by side,
imported onto the Silhouette Studio.  The left side of
the page looks darker than the right side only because it's
"sitting" on the 12x12 mat view.

This screen shot shows you two Wii controllers, flood-filled
in white (left side of the page).  I used the game controller image
by Nathan Jenne (Design ID #15437), purchased from the Silhouette Store. 
As you can see, I sized two of the game controller images the way I
would want them to look.  I used my Cameo to cut the game controller images.  
 
 
And here are some closeups of the finished pages.
 
I used foam mounts to make the die cuts pop out of the page a little.

I used twine and white ribbon and scrap pieces of a beige
CS for the controller handles.


Hope you liked my project today.  Stop by in the next few weeks as I show you more of my printed digital pages - I'm really just waiting on some cheap Epson papers I found online :) - hope they get here soon.   

Thursday, May 9, 2013

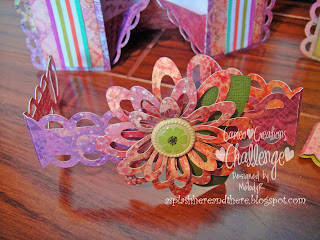
Cameo Creations Challenge - Full Bloom


It's another Cameo Creations Challenge and here's my DT contribution.  The theme these next two weeks is Full Bloom and we were asked to include flowers in our creations.  These are box cards designed by Samantha Walker (Design ID #42027) and the image was purchased through the Silhouette Store.  The flower image is by Lori Whitlock (Design ID #40827), also from the Silhouette Store.  The double-sided CS I used were from a paper pack by K&Company.  The ribbons were from my stash (most definitely purchased from Michaels).  The brads for the center of the flowers were also from my stash but I can't seem to remember the brand since I've had them for a long time.

Here are some closeups of my project.  These cards were created for the teachers at my kids' school, intended to house some giftcards for them.  These were so easy to make!


I used the Abbeyline font to type the sentiment for the inside layer of the box card and used the print and cut feature of the Cameo.


Thanks for visiting me today.  Hope to see what you link up with CCC these next 2 weeks!  Have a wonderful Thursday! 

Sunday, May 5, 2013

Teacher Appreciation cards


Hello there!  This post can also be viewed over at the Bugbytes.  Thanks Pam for letting me share my projects with her readers once a month.  This coming week is Teacher Appreciation week and I was commissioned by my SIL to create thank you cards for the teachers and teachers' assistants at my nephew's school.  I had to make 37 cards in all, big enough to accommodate gift cards my SIL has collected from the other parents.  I actually ended up making 40 cards in all and kept 3 for myself (pictured above) so I can give them to the teachers at MY kids' school.  Now this was a big task for me for such a short period of time to make them - and one I probably wouldn't do again for a looooong time ;) - heck honestly, it normally takes me a few days to make one card as it is LOL! 

For this big task, I used the Silhouette Studio to design the cards and used my Cameo to cut.  I opted to fill in the colors of my choice for the school-related images (pencil, scissors, glue, eraser and paint brush - all can be found in the Silhouette Store) and did a print and cut - so much easier than piecing together those tiny parts. The cards are 5x5. 

Below are screen shots of the colored images after filling in the colors and grouping them together.

bottom layers with the shadow layer filled in with brown,
set to print  and cut only the outer parts
 
top layers without the shadow layer and the sentiments
typed in or set to print only and cut the edges of the images only 
 
And here are pictures of the images after printing and cutting.
 
bottom layers


top layers

I used foam mounts to adhere the top layers with their corresponding bottom layers, after inking the top layers, for some dimension.  Below are pictures of the finished cards.  No two cards are exactly the same.


And there you have it.  Thanks for visiting me today. 

Also linking to the following challenges:
Tuesday Throwdown#145 - Teacher Thank You cards
The Old Backporch - 52 card pickup